Thursday, September 30, 2010

Cranberry-Topped Crumb Cake

Photobucket


One of my favorite things about cooking is the escape factor. Living in a house with 5 other people it can sometimes get a little claustrophobic. There aren't a lot of things or places that are just mine. I know though that once I start a recipe that I can get as much time as the recipe takes to just loose myself in the ingredients.

I let the kids know that Momma is creating, cooking and that they can have a taste when it's finished if they just let me have some time. It's a peaceful and gratifying experience. Plus cake for breakfast the next morning...what's not to like about that?


Crumb-Topped Cranberry Cake
Taste of Home Holiday Thanksgiving 2010

Ingredients:
2 cups plus 2 Tablespoons all-purpose flour
2/3 cup sugar
1/2 teaspoon baking powder
1/2 teaspoon baking soda
1 package 8 oz cream cheese, divided
2 eggs
3/4 cup 2 % milk
2 Tablespoons canola oil
1 teaspoon vanilla extract
1/2 cup flaked coconut
1 cup whole berry cranberry sauce 

Topping:

6 Tablespoons all-purpose flour
2 Tablespoons sugar
2 Tablespoons cold butter

In a large bowl, combine flour, sugar, baking powder and soda; cut in 3 ounces cream cheese until mixture resembles fine crumbs. In another bowl whisk 1 egg, milk and oil; stir into crumb mixture just until moistened. Spread batter into a greased and floured 9-inch spring form pan; set aside.

In a small bowl, beat remaining cream cheese. Beat in vanilla and remaining egg; carefully spread over batter. Sprinkle with coconut. Dollop with cranberry sauce. In a small bowl, combine flour and sugar; cut in butter until crumbly. Sprinkle over the top.

Bake at 350 degrees for 50-55 minutes or until golden brown, Cool on a wire rack for 15 minutes. Carefully run a knife around the edge of pan to loosen Remove side of pan. Cool completely. Store in the refrigerator.

Yield 12 servings.

Photobucket

Bookmark and Share

Wednesday, September 29, 2010

Stuffed Spuds

I've been looking for recipes that I can make and freeze so on those crazy-busy nights I have something easy to pull out and heat up.  I discovered The Best Freezer Cookbook at my local library.  As I do with all my cookbooks, I grabbed a cup of coffee and a pack of sticky notes then I flipped through and tagged the recipes I thought my family might enjoy.  The first recipe I tried was Beef-Stuffed Spuds. 

Ingredients:
4 large baking potatoes
8oz lean ground beef
1/3 cup finely chopped onions
1 clove garlic, minced
1 tsp. Worcestershire sauce
salt and pepper
1/2 cup sour cream
1 cup shredded Cheddar cheese
2 Tbsp. chopped parsley

Directions:
1.  Bake potatoes approx 1 hr. at 400 degrees
2.  In a large skillet, over medium-high heat, cook beef for 4 minutes or until no longer pink, breaking it up as you go.
3.  Reduce heat to medium.  Add onions, garlic and Worcestershire sauce; season with salt and pepper.  Cook, stirring often, for 4 minutes or until onions are softened.

Stuffed Spuds

4.  Cut warm potatoes in half lengthwise.  Carefully scoop out each potato, leaving a 1/4 inch shell; set shells aside.
5.  In a bowl, mash potatoes; beat in enough sour cream until smooth.  Stir in beef mixture, half the cheese and all the parsely; season with salt and pepper to taste.  Spoon into potato shells; top with remaining cheese.

Stuffed Spuds

6.  Arrange in shallow baking dish; bake in a preheated oven for 15 minutes or until cheese is melted. 

Stuffed Spuds

I cooked these and ate them right out of the oven.  Since my family enjoyed them (and my husband really would like to see them return to our dinner table!) the next time I make them I will bake a double batch and freeze the extras.  I served them with some steamed broccoli and some fresh cherry tomatoes right out of the garden.

{To freeze:  Cool.  Wrap individually in plastic wrap, then in foil.  Freeze for up to 2 months.  To serve:  Thaw in refrigerator overnight.  Unwrap and bake in a preheated oven (350) for about 20 minutes until heated through.}

Bookmark and Share
Photobucket

Tuesday, September 28, 2010

The Real First Day of Fall

This past Sunday was the first real day of Fall here in Oklahoma - I don't care what the calendar says.  It was the first time that we were able to hang out without really getting worn out from the heat. It was even a little chilly.

We hung out at the park in our brand spankin new jeans and hoodies riding bikes and playing catch.

Photobucket

Photobucket

This is the time of year I get this incredible urge to have soups and stews. I thought about making chili this week but when I saw this recipe in Every Day with Rachael Ray I knew that it would hit that sweet meaty spot in my heart.

This was my first time braising anything so I was not sure what to expect. While it did take 3 and a half hours to cook - most of the work was done by my oven. I only had to open it every 30 minutes and spin the pans around.  It was so worth the effort but more of a Sunday Supper kind of meal.


Photobucket
It took so long that Hubby and I ate after the kids were already in bed.


Stout Braised Short Ribs
Everyday with Rachael Ray magazine Oct 2010

Ingredients:

8 large bone-in beef short ribs (I used the only beef ribs that were available in my area)
1 1/2 teaspoons ground cumin
Salt and pepper
3 Tablespoons extra-virgin olive oil
3 leeks, white and light green parts only, finely chopped and rinsed*
6 cloves of garlic, finely chopped
2 Tablespoons tomato paste
One 12-ounce bottle stout beer
3 springs thyme
1 pound carrots, halved lengthwise and cut crosswise 2 inches thick
1/2 pound green beans, preferably haricots verts


Preheat oven to 325 degrees Rub the short ribs with the cumin and season with salt and pepper. In a large dutch oven, heat 2 Tablespoons olive oil over medium high heat. Working in batches brown on all sides; transfer to a platter. Discard all but 1 Tablespoon of fat from the pot.

Photobucket

Lower heat to medium, add leeks and cook, stirring until softened, about 7 minutes. Add garlic and tomato paste and cook for 3 minutes. Add 2 cups water, the beer and thyme. Return the ribs to the pot, cover and cook in the over, rotating every 30 minutes, until the meat is very tender, about 3 hours.

Photobucket

Meanwhile, in a large pot of boiling, salted water, cook the carrots and green beans until crisp tender, about 1 minute. Drain.

In a large skillet, heat the remaining 1 Tablespoon olive oil over medium heat. Add the vegetables and cook, tossing, until warmed through; season with salt and pepper. Serve with the short ribs.

Bookmark and Share


Hubby said this was a Man's Meal - said all he wanted to do was grunt while eating this dish!

Photobucket

Monday, September 27, 2010

Super Low-Fat Granola Cereal

I found a recipe in the August/September issue of Taste of Home Magazine that caught my eye.

Super Low-Fat Granola Cereal

Ingredients:

8 Cups old-fashioned oats
1 Cup raisins
1/2 Cup chopped dried apricots
1/2 Cup dried cranberries
1 1/2 Cups packed brown sugar
1/2 Cup water
1 tsp. salt
1 tsp. maple extract
1 tsp. vanilla

Yields 9 cups.  Prep time 15 minutes.  Bake 25 minutes.  Cooling.

See these pretty cereal bowls?  I usually keep these in the cupboard above the refrigerator.  Sad, I know, but I really like them and don't want them to get broken.  That said I can't enjoy them up there either.  So this week I'm pulling them down an enjoying them!  My younger sister gave these to me a few years back.  I knew they were vintage but I seriously didn't know they were cereal bowls until this morning when I jumped online and found them selling for $34.00 a piece on ebay.  Good grief!  Part of me seriously wants to put them back up in the cupboard for safe keeping!    I need to to not turn back so let's get cooking, shall we?

1.)  In a large bowl, combine the oats, raisins, apricots and cranberries, set aside.

2.)  In a saucepan, combine the brown sugar, water and salt.  Cook and stir over medium heat for 3-4 minutes or until brown sugar ins dissolved.  Remove from heat and stir in extracts.  Pour over oat mixture, stir to coat.

3.)  Transfer to two greased 15-in. X 10-in. baking pans.  Bake at 350 degrees for 25 - 30 minutes or until crisp, stirring every 10 minutes.  Cool completely on wire racks.  Store in an airtight container. 

4.)  Serve with milk or yogurt.  Pretty pink, circa 1920 glass cereal bowls are optional.
Bookmark and Share
    Photobucket

Friday, September 24, 2010

Ginger Snaps


Happy Autumn, everyone!  This is my most, most favorite time of the whole entire year.  Once our temperatures (and the dang humidity) here in Atlanta finally drop, I will be a complete spazz and constantly yapping about Fall and the Holidays and on and on.  You've been forewarned :)  Really tho, I couldn't think of a better, easier way to dip my toes into Fall than by whipping up these Gingersnaps. 

A couple of things: 

Baking cookies nearly always follows a few-step process.  For those who are freaked about baking cookies from scratch or just plain find it frustrating, I'm hoping to help.  Consider me your Cookie Coach.  Ask and you shall receive..answers, that is :)  I realized as I was typing this, that I have lots more to say about cookies and baking, but I'm saving the other stuff for another post.  Being overwhelming with info is never a good thing.   Anyway, I included photos of each step so that you can see what it will look like as it goes together.  If you have questions, definitely ask, okey doke?

Thing 2:  I'm still trying to cope with baking in a place with massive humidity.  I was spoiled having spent all my years in climates with dry summers, whew.  So, to me, these cookies turned out flat.  It's my same recipe I've been using for 10 years, but they normally turn out a little taller.  I've had similar experience with my trusty chocolate chip cookie recipe.  If any of you seasoned Southern bakers has advice, pleeeeease share it with me us!

Stomp a few crispy leaves for me,


Chewy Ginger Snaps
courtesy of my old Betty Crocker cookbook

2 1/4 c. flour
2 tsp. baking soda
1 tsp. ginger
1 tsp. cinnamon
1/2 tsp. cloves
1/4 tsp. salt

1 c. brown sugar
3/4 c. butter-flavor shortening
1/4 c. molasses
1 egg

sugar for rolling, approx 1/2 c.

Preheat oven to 375 degrees.  Mix dry ingredients in a separate bowl and set aside.  Using a mixer, cream together the sugar and shortening.  Add molasses and egg, scraping down the sides of the bowl with a spatula.  Add dry mixture, a third at a time, scraping the sides of the bowl after each addition. Shape dough by rounded teasponfuls into balls. Roll balls in sugar. Bake on lightly greased cookie sheet for 10-12 minutes (or until edges are dry and centers just done). Let cool on cookie sheet. Makes about 2 dozen.


Mix dry ingredients in a separate bowl.


Cream the sugar and the fat.
(Crisco here, butter other times)


Add the egg and any remaining wet ingredients.
(Molasses here, vanilla other times)


Mix in the dry ingredients, 1/3 at a time.
It may look dry and thick, but fear not!


Thick dough.


A cookie scoop ensures evenly sized cookies.
Plus, it's just easier than the 2 spoon method.


I swear by Airbake style, insulated cookie sheets.
(My favorite cookie sheet is my warped and thoroughly beat up one.)


Rotate the cookie sheet halfway through baking.
Most ovens cook hotter in the back than the front, so
we're evening out the cooking and browning.


If you're feeling particularly indulgent, press a
Dove Promise into each cookie.


Bookmark and Share
   

Thursday, September 23, 2010

oops

So while I was making dinner tonight I kept having this nagging feeling like I was forgetting something.  While I was cleaning up it hit me.  Today is Thursday.  Today is my day to post a recipe.  Um, oops....I kind of forgot about that! 

Well, that isn't true, I didn't forget.  I was thinking of it in the beginning of the week. I actually had a recipe ready to go and all I needed to do was post it.  But I kept getting side tracked (with things like a sick kid, computer issues, some drama going on in life) and Thursday kind of snuck up on me.  So here it is now, almost 9 pm and I'm just getting my first chance of the day to log onto the computer.  I'm kind of beat and feeling lazy to get it posted now so all I have to serve up to you tonight is a whole lot of excuses with a side of guilt (for myself). 

So since I've got nothing for you how about sharing with me?  When you find yourself tight on time and looking for something easy to put together for dinner (and don't want to order take out again) what do you like to throw together? 

I promise I'll have something good for you next week.

Bookmark and Share
Photobucket

Wednesday, September 22, 2010

Cheesy Chicken & Corn Casserole

**Brandy aka The Royal Family asked me (the other Brandy) to guest post because her entire family has been hit with the sickies. I wish them a quick recovery & hope that you like my dish!

Recently I stumbled across a site by the name of Southern Plate and then proceeded to spend hours reading through the recipes & family antidotes. Warning: If you are trying to lose weight do NOT go to this blog. It is full of comfort food. Down home, simple, delicious, comfort food like the Cheesy Chicken & Corn Casserole I made last night.

Oh my.

Everything you need should already be in your kitchen because again these are simple recipes. Not like that crazy stuff that Top Chef contestants come up with, but real food that real people (like me) can make and enjoy.


You'll need:

1 box/packet of saffron rice (or Zatarain's as SP uses)
1 1/2 - 2 cups cooked chicken, diced/shredded
1 can cream of chicken soup
1 can corn, drained
2 cups cheddar cheese
2 Tbsp butter (see note)

Cook rice according to directions. Reserving 1/2 cup of cheese, mix everything else together including the cooked rice. (That means only 1 1/2 cups goes in now for the directionally challenged.)


After it's well mixed, put the remaining cheese on top. Bake in a 350 degree oven for 30 minutes or until everything is nice and bubbly.


Note:
-SP's original recipe called for a WHOLE stick of butter. I thought uh, no, and used 1/2 stick. Even that could be cut back without affecting the recipe I think. Next time I may even omit the butter all together.

-You'll notice that I just mixed everything up in my casserole dish. I mean why dirty a bowl for nothing right?

-As displayed by the previous statement I am lazy so I typically cook & freeze chopped chicken and ground hamburger. That way I only make one mess but I have cooked meat ready for me whenever I need it. Obviously if you don't do that you will have the extra step of cooking and chopping your chicken.


It may not be the prettiest dish to hit our plates but this casserole was delicious. We give it 5 spoons!


Tuesday, September 21, 2010

Getting to Know Me:


What is your go to dish: It really depends of what occasion it's for...potlucks or company...I make a grazing plate of cheeses, meats, hot sauced nuts, olives and bread...very fancy (but secretly easy) and for just at home cooking...it's Turkey Chili all the way!!

Who are you cooking for: My Family: Hubby and I have 4 kids from ages 3-9. I made the mistake of only giving my oldest things that I thought kids would like...and now he only eats what you would think kids would like...but with the other 3-- I learned from my mistake and they eat everything that I do!! We all just convince my 9 year old to try it.

How did you learn to cook: When my first was born, I was lucky enough to be able to stay at home with him...we would watch the food network every day while we played and cleaned...I always thought that they made things that I never could...until one day I tuned in at the right time and caught 30 min meals with Rachael Ray...she was so good at explaining that the recipes she did were just methods...that I started giving it a try!!

Worse recipe disaster: I was getting some dishes ready to take to my Mother-in-Law's for Thanksgiving dinner and I had to many things going on at once...I pulled a glass 9 x 13 out of the oven full of the Yummiest pumpkin dessert - Ooey Gooey Butter Cake -and put it one the stove top...a few seconds later it literally exploded all over my kitchen!! Turns out I had left one of the burners on low ON and if you can imagine -- there was Pumpkin everywhere!! I just sat and cried...not only was it ruined but there was a shower of glass in my other dishes...So I didn't get to bring anything to Thanksgiving...Lesson Learned -- Check those Burners!!

Best recipe: Grazing Plate or
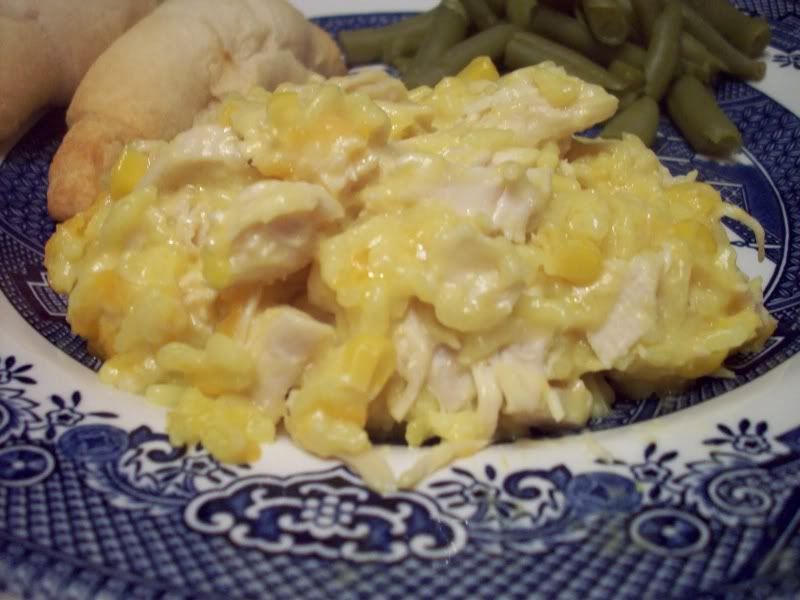
 Turkey Chili

Do you take your kids in the kitchen: Yes!! My mom worked - Which I am having to do now - and didn't have the time or the energy to teach me to cook...I really want to make sure that they are more prepared than I was.

Personal cooking goals: I want to try out something new every week...I want to make the recipes that I tear out of magazines instead of stuffing them in a drawer...I want to learn to bake bread from scratch...and I want to teach my kids the same love of creating food that I have!

Favorite cooking utensil: A Giant Cutting board and my Garbage bowl!!

Favorite Method of cooking: (i.e. crock pot, one pot meals, bbq etc..) I love to make soups, chili's and stews so I would have to say one pot wonders.

Do you bake: No -- But I am really wanting to learn.

Favorite Beverage while cooking: Coffee with splenda.

Does your husband/boyfriend cook: Yes!! Esp when I go on strike...this happens sometimes when I get tired of everyone expecting me to do everything!! LOL - His specialty is breakfast for dinner.

Childhood memory about food: I always loved visiting my Grandma Lulu's...she always had puppy chow (chex mix) in her freezer...every Christmas when I make this for my kids, she is who I am thinking about.

What is your favorite food to eat: BEAR CLAWS and Frito Chili Pie -- just not together.

Favorite place to go eat at when you don't want to cook: My actual favorite is ordering in Pizza or Chinese...but if we go out I love to go to the Cheese Cake Factory!! They have the yummiest food!

What do you want to teach your children through cooking: I want to teach them creativity and confidence in the kitchen. I want them to be able to take care of themselves and the families that they will have. I want to teach my boys to help their wives and my daughter all the things that I wish I had known when I first started my family.

What is your favorite dessert: This is a hard one...I am more of a carb girl...not so much into the sweets...but If I had to pick just one dessert-- Cake Pops!!

What is your favorite junk food: Carbs-- bring on the crackers, chips and all other crunchy - big butt making - thunder thigh creating -- Carb Goodness!

Do you have a food weakness: BEAR CLAWS; I know that they are over 500 calories a piece, but every once in a while I eat them!

What time is supper/dinner: I usually start cooking supper around 6:00 -- this is a far cry from where we were when Hubby worked night's -- used to be 10:30!!

Monday, September 20, 2010

Veggie Stuffed Calzone

I found this week's recipe in the September 2010 issue of Fitness magazine. It sounded so good I had to try it!
(Do you think I could look like that if I ate enough Veggie Stuffed Calzones?!) ;)
*
Veggie Stuffed Calzone
*
Ingredients:
Nonstick cooking spray
1 pound frozen bread dough, thawed ( I made my own white/whole wheat)
1/4 cup prepared basil pesto
4 cups frozen mixed vegetables, thawed
Salt
Freshly ground pepper
1 cup shredded part-skim mozzarella
1 tablespoon grated Parmesan
*
1.) Preheat oven to 375 degrees. Coat a large baking sheet with cooking spray. I chose to use a sheet of parchment paper.
2.) Form the thawed bread dough into a ball and then roll out into a 15-inch circle.

3.) Spread the pesto over dough to within 1/2 inch of the edge.

4.) Place the vegetables on one half of the dough and season to taste with salt and black pepper.

5.) Sprinkle with the mozzarella.

5.) Fold dough over vegetables and pinch around the edge to seal. Transfer the calzone to prepared baking sheet, mist with cooking spray and sprinkle with the Parmesan.

6.) Bake 15 to 20 minutes or until golden brown. Let stand 5 minutes before slicing into wedges.
I could get into the habit of making this every week! It was so delicious! Plus it only took 10 minutes to put together, so I had this on the table in 35 minutes. Very nice. It made 4 very hearty servings. our family gives this a definite 5 spoon rating!
Blessings,
Teresa
Related Posts Plugin for WordPress, Blogger...